Hey everyone! I’m catching up on the blog after taking a week off. Last weekend we took a quick trip to NC (a gift from my in-laws for Christmas) so I’m running behind. We just came home from a Super bowl party and I’m going to bed in a few so this will be short and sweet, but hey my mom will appreciate it!
Over the past 2 weeks or so I’ve been working on a birthday calendar for my mom. I really love birthdays and buying the perfect gift for loved ones, so I’m pretty vigilant about knowing when everyone in my (humongous) family was born. I really want to make a permanent birthday calendar for our house, but it’s better to practice on someone else right?
This is what it looks like thus far.

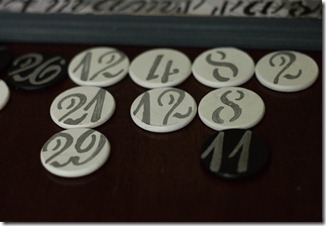

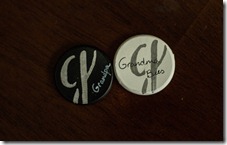
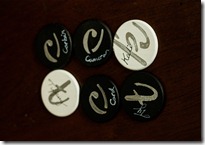
I used modge podge and scrapbook paper for the background on the ‘Family’ sign. It came in really handy and was easy to use in order to cover up mistakes. I just chose a simple modge podge package. It was advertised as being used for preserving puzzles, but hey it worked. For all the letters and numbers I used Martha Stewart stencils (bought at Michaels). The little wooden disks were also bought at Michaels. I chose to use white paint to designate the female birthdays in the family and black paint to designate the male birthdays in the family. I thought the grey used for the initials and numbers brought it all together though.
Josh is going to put in some hangers (I have no idea what the actual name is) for all of the months and then I’m going to hang the disks sideways. I made sure the ‘Family’ sign was 12 inches across but didn’t think to limit my disks to 1 inch across each. Oh no, instead I bought 1 1/2 inch disks. Oh well, I think it’s good practice and my mom seemed to like it. At least it was, and still is, a learning experience. As for the disks, I put the dates on one side and the names (and initials) on the other. Overall I was pleased! I’ll post pictures when it’s all finished up.
We also got in our ginormous painting for the bedroom from Je at Art of Texture. This is what it looks like


I’m hoping to add some emerald green curtains and accessories along with some grey paint and a monogramed pillow. I’ll post pictures as soon as it’s done! We’re making progress.
Other than that we’ve been enjoying some snow days. Opti and Josh played in the yard while I did my nails and messed around with the camera. A glittery French manicure and cuddling with my baby? Yes please.


We also made some of my uncle Doug’s famous chili for the party and I can tell you it was a hit. I’m off to sleep! Hope your team won the big game!
Over the past 2 weeks or so I’ve been working on a birthday calendar for my mom. I really love birthdays and buying the perfect gift for loved ones, so I’m pretty vigilant about knowing when everyone in my (humongous) family was born. I really want to make a permanent birthday calendar for our house, but it’s better to practice on someone else right?
This is what it looks like thus far.


I used modge podge and scrapbook paper for the background on the ‘Family’ sign. It came in really handy and was easy to use in order to cover up mistakes. I just chose a simple modge podge package. It was advertised as being used for preserving puzzles, but hey it worked. For all the letters and numbers I used Martha Stewart stencils (bought at Michaels). The little wooden disks were also bought at Michaels. I chose to use white paint to designate the female birthdays in the family and black paint to designate the male birthdays in the family. I thought the grey used for the initials and numbers brought it all together though.
Josh is going to put in some hangers (I have no idea what the actual name is) for all of the months and then I’m going to hang the disks sideways. I made sure the ‘Family’ sign was 12 inches across but didn’t think to limit my disks to 1 inch across each. Oh no, instead I bought 1 1/2 inch disks. Oh well, I think it’s good practice and my mom seemed to like it. At least it was, and still is, a learning experience. As for the disks, I put the dates on one side and the names (and initials) on the other. Overall I was pleased! I’ll post pictures when it’s all finished up.
We also got in our ginormous painting for the bedroom from Je at Art of Texture. This is what it looks like


I’m hoping to add some emerald green curtains and accessories along with some grey paint and a monogramed pillow. I’ll post pictures as soon as it’s done! We’re making progress.
Other than that we’ve been enjoying some snow days. Opti and Josh played in the yard while I did my nails and messed around with the camera. A glittery French manicure and cuddling with my baby? Yes please.


We also made some of my uncle Doug’s famous chili for the party and I can tell you it was a hit. I’m off to sleep! Hope your team won the big game!
Comments
Post a Comment